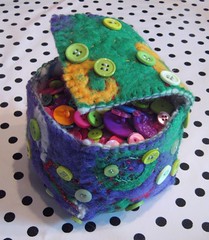
 I crack myself up sometimes. Yes, this is a box made from this piece of felt (that I made using the wet felting technique.) Need to know how to do this? of course you do! Sign up for my Wet-Felting workshop in Idyllwild July 6! You can see more view of this adorable (if I do say so myself) box here and here
Wednesday, June 30, 2010
What, you don't have a felt box for your buttons??
I crack myself up sometimes. Yes, this is a box made from this piece of felt (that I made using the wet felting technique.) Need to know how to do this? of course you do! Sign up for my Wet-Felting workshop in Idyllwild July 6! You can see more view of this adorable (if I do say so myself) box here and hereTuesday, June 29, 2010
Speaking of Quiltlets
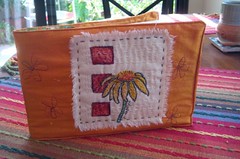
 Have you seen Lyric Kinard's "Surface Design Sampler Platter? It's a wonderous DVD with sooo many fabulous and creative ideas. Lyric's a terrific teacher and very talented. After watching her DVD again (there are so many techniques to try!) I was inspired to make this sketchbook cover for my Moleskine Watercolor journal Really easy and amazingly clever construction. And as you can see, I used one of my Quiltlets.
 Speaking of Quiltlets, are you going to the Quilt Festival in Long Beach? I'm teaching Quiltlets: Very small quilts for short attention spans on Thursday, July 22: 9am-noon. Create a tiny, hand painted quilt of your own design using simple materials. I will gently guide you to draw your own design or trace a copyright free image onto cloth, then paint and hand stitch, using some fun basic embroidery stitches. Your creation could be used on it’s own as embellishment for a jacket or tote, or create more for a larger piece.
Wanna win a FREE spot in my workshop?? (Of course, you have to be in Long Beach, California on July 22) Leave a comment. I'll select a name on July 4th.
Monday, June 28, 2010
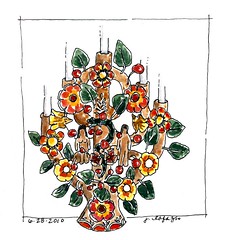
venice horses sample
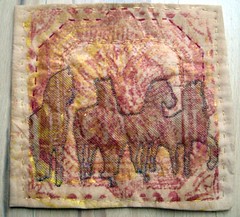 If you know me, you know I pretty much never make practice pieces or samples, I just go for it. Not this time! Shown is a 5 inch square, with a rubbing on it and an overlay of the Four Horses of San Marco in tulle. ( A technique I learned from Melly Testa a couple of years ago. I did the outline of my photo on tracing paper, and then free motioned, then cut away the tulle from the silhouette.) I'm thinking of doing this much larger on my Venice quilt. I'll keep you posted
Sunday, June 27, 2010
"venice" in progress ~detail
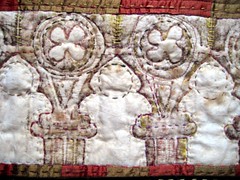 When I was in Italy recently, I saw so many opportunities to make rubbings on cloth. I was sorry I'd hadn't brought along a piece of tea-dyed cotton, and some fabric crayons--there were soooo many old, fascinating textures. When I got home, I started this project. I'm continuing to build it and stitch on it. I'm going to add more shapes and more panels. Stay tuned!
"venice" in progress ~detail
 I'm using Shiva Paintstiks to do the rubbings (messy, but the iridescent colors are perfect). I want to add a sheer silhouette of the Horses overlaying the quilt...but first I'll experiment on a smaller piece.
Saturday, June 26, 2010
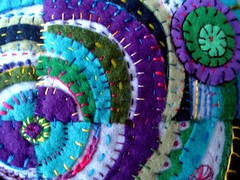
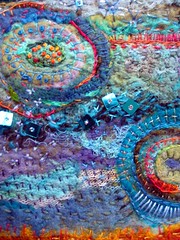
circles pillow
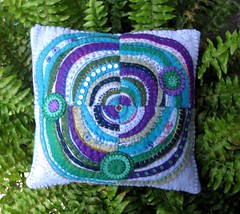 My new motto "When in doubt, make it into a pillow." You can see the back here and here (I didn't have enough felt, so I pieced the back together) and another detail shot here. This was made using my "Recycled Circles" technique using wool felt instead of paper.
Thursday, June 24, 2010
Vote for my Beachcombing fabric on Spoonflower...please?
Please go here and scroll through the pages to find my Beachcombing fabric in the Spoonflower contest, then go to the last page, scroll down and submit your vote !
(corrected. Thanks Artymess!)

(corrected. Thanks Artymess!)
Wednesday, June 23, 2010
I'm teaching in North Carolina
 Woo hoo! I'm teaching in North Carolina! Saluda, at Random Arts to be specific. Saturday, September 25, "Sketching & Watercolor: Journal Style" It will be an all day workshop, and we're working out the details now. Contact Jane Powell to get your name on the list.
Tuesday, June 22, 2010
new postcard!
 Overnight Prints is having a sale, so I created a new postcard.I'll be giving them away at my workshops and Long Beach Quilt Festival.
 Monday, June 21, 2010
Quiltlets
 I'm teaching "Quiltlets:Very Small Quilts for Short Attention Spans" at the Long Beach Quilt Festival on Thursday, July 22 from 9am-noon. I'll be giving away a spot in the class! Details on the give-away next week, when I show you a project I made with one of my Quiltlets. (You can see more of my Quiltlets here)
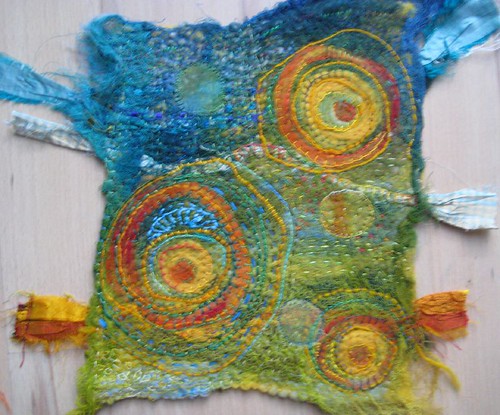
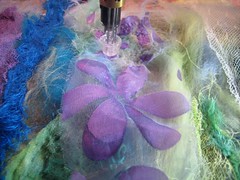
rainbow series purple blue
Sunday, June 20, 2010
Spoonflower goodie bags
 I do love Spoonflower fabric, and I just made my fabric available for sale. I've made these little goodie bags, from my fabric as a gift for my students at the Mixed Media Retreat in Utah.
 felted soaps
 I made these felted soaps before I left for Italy, as gifts for my students there. I learned how to make these by following Judy Coates Perez tutorial.
Saturday, June 19, 2010
Tutorial Tsunami Day FOUR!
More inspiration and information from Judy Coates Perez and how to print on teabags (oh my gosh, I don't drink tea, but now I'm going to start!) and Gloria Hansen does shibori cloth with paint and Alma Stoller has an extremely clever way to turn old magazines into a great painting surface.
Four days of fabulous tutorials from my creative and talented friends! That will keep us all busy. Please check out all the tutorials, comment and let us know if you make any of them!
Four days of fabulous tutorials from my creative and talented friends! That will keep us all busy. Please check out all the tutorials, comment and let us know if you make any of them!


Friday, June 18, 2010
tutorial tsunami DAY THREE!
Day three! Kelli Nina Perkins has a video tutorial on making poetry spoons and Traci Lyn Huskamp has a tutorial on making nature inspired greeting cards. Geez, I have talented friends! and more tutorials from my friends coming tomorrow....
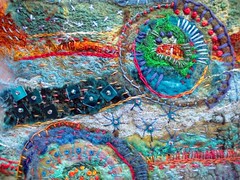
Pillow--with a sort of green olive motif
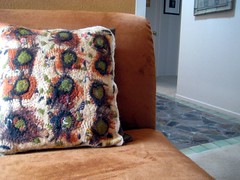 Usually I say " I don't do functional" when I talk about my art. But you know how that goes, once you say something definitive, it's often quickly disproved. So, here's some functional art! I WET-felted this piece and then hand stitched like crazy and put it on brown dupioni silk and inserted a pillow form. Cool huh? You can see the details here, here, and here. I'll be teaching Wet-Felting in Idyllwild on Tuesday, July 8. We'll make a piece of felt in the morning (no machines needed, just elbow grease) and then embellish it in the afternoon.
Thursday, June 17, 2010
Tutorial Tsunami ~ Day Two!
My pals Lyric Kinard has this waay cool tutorial on shoe revitalization and Alisa Burke has a fashion statement too. Check them out!
Rainbow Series: Teal and Gold
 The completed piece from my tutorial. Look here to see how I mounted the other piece, on dupioni silk and then stretcher bars. I've got this piece, and in my JaneVille Etsy shop. And by the way, all my blog tutorials are listed on the lower right side of my blog.
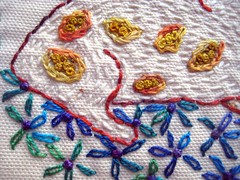
Rainbow Series: Teal and Gold ~detail
 With detail shot, you can see I've done lots of different, but simple embroidery stitches--the needle felt is a dream to stitch through. I've also included a few square sequins just for a little sparkle.
Rainbow Series: Teal and Gold ~ detail
 Another detail from this piece. The hand-stitching took 2-3 evenings (I hand stitch while watching TV with my husb--only educational programing of course--haha.)
Wednesday, June 16, 2010
Tutorial Tsunami!
My needle-felting tutorial is below. I'll post the finished piece tomorrow.
Once you've mastered that, go take a look at Melanie Testa's tutorial (hint: her signature surface design!) and Diana Trout's Sumi Swoosh tutorial. And I'll link to more tutorials tomorrow! woohoo, hang on for the ride!
Once you've mastered that, go take a look at Melanie Testa's tutorial (hint: her signature surface design!) and Diana Trout's Sumi Swoosh tutorial. And I'll link to more tutorials tomorrow! woohoo, hang on for the ride!
Tuesday, June 15, 2010
Machine Needle-felting Tutorial
 |
| 1. First I gather my materials, by color. Starting with the kit from Suzanne Morgan (Refer back to the piece I made last week, and follow along with my article from Quilting Arts, seen here.) |
 |
| 2. From my own stash: Recycled Sari Ribbon |
 |
| 3. Iron the ribbon flat |
 |
| 4. Sheers from my stash. Some dyed and some plain |
 |
| 5. Wool roving and knitting rejects and some silk roving (only because I already have it.) |
 |
| 6. Lay out the pre-felt piece |
 |
| 7. I begin building the layers by laying out a thin layer of roving, all in one direction. |
 |
8. Using your needle felting machine, 'sew' down the center of the piece to begin anchoring the roving.
|
 |
| 9. Anchor roving by needle felting a few rows |
 |
| 10. Begin adding layers of texture like ribbons and bits of knitting. I like the ribbons to run off the edge, you can always trim them later. |
 |
11. After your roving textured pieces are down and lightly secured, begin adding strips of sheers, like organza, tulle, cheesecloth to cover the whole surface.
|
 |
| 12.Once the whole surface is covered with strips/pieces of sheer, needle-felt the whole piece securely. I go over the whole surface to compress the layers. |
 |
13. Here's a view from the back. I also needle felt from the back, which will bring up the backing color to the front.
|
 |
| 14. Here's a close up of the front, you can see how compressed it is. |
 |
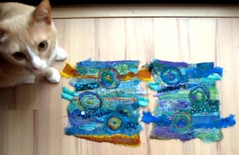
| 15. Because I like to work small, I cut the piece in half and now I have a series! :-) |
 |
| 16. At this stage, I'll add any additional color or shape to balance the composition. |
 |
| 17. Once you're happy with your background, you can add shapes (I like circles) using roving, yarn and ribbon. |
 |
| In progress ~ machine needle felting by Jane LaFazio |
 |
| In progress ~ machine needle felting by Jane LaFazio |
 |
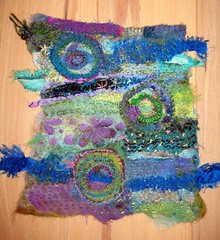
| Machine Needle Felted "Rainbow Series: Turquoise and Gold" by Jane LaFazio |
 |
| "Evidence of Fossils" by Jane LaFazio |
 |
| "Rainbow Series: Green and Blue" by Jane LaFazio |
 |
| "Rainbow Series: Pink and Yellow" by Jane LaFazio |
tomorrow a tutorial
 I'll post a tutorial tomorrow on needle-felting. AND, some of my friends will also be posting tutorials, tomorrow and for the next few days. I'll link to them each day. Hold onto your hats! It's a Tutorial Tsunami!
Subscribe to:
Posts (Atom)